Try Again or Select Rf Setup
This document is available in PDF format!Click here to download!
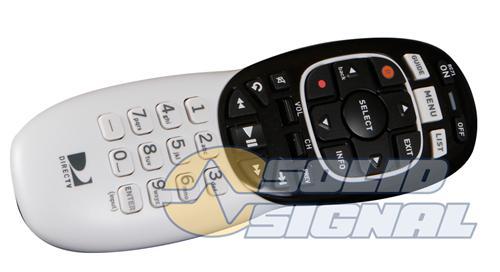
If your remote looks like this:
Y'all can utilise this tutorial instead.
DIRECTV'southward RC series remotes are powerful. And then powerful that some of them tin can see through walls and doors, even cabinets. All it takes is a little time spent configuring them. If your DIRECTV system was installed past a professional person, he probably did all the programming for you. If you lot installed information technology yourself or if you are putting in a replacement remote you may not know what all the steps are.
Stride ane: Decide your remote model
Most people have a white DIRECTV remote similar the one above. Even so, there are several models of DIRECTV remote, each with slightly dissimilar capabilities. Information technology's important that your remote take an "R" as the final letter or second to last alphabetic character, as you lot see here:

This is an RC65RX. If it were an RC65R, that would be ok, but if it were an RC65X, that would not be ok.
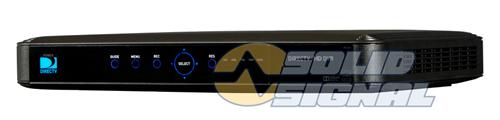
If you accept DIRECTV hardware made after 2013, including:
- HR44 Genie and H44 Genie Lite
- C41, C41W, and C61K Genie Clients
- 2013 or afterward DIRECTV-set up TVs
These receivers come with a Genie remote that works very similar to the Ten-serial self-programming remotes. The earlier white remotes can be used in IR mode with the newer hardware, but they will not cocky-program fifty-fifty if y'all have an 10-series remote.
Footstep ii: Brand sure your receiver is compatible.
Almost all current DIRECTV receivers will piece of work with an RF remote. If your receiver is on this listing, information technology'southward all set for RF remote use:
- R15
- R16
- R22
- HR20*
- HR21
- HR22
- HR23
- HR24
- HR34
- HR44*
- HR54-*
- H21
- H23
- H24
- H25*
- H44*
- C31
- C41*
- C41W*
- C51*
- C61*
- C61K*
- THR22 TiVo*
That's pretty much every receiver since about 2003 except the D-series SD receivers. There are a few receivers that need special attending:
HR20-100 and R15 DVRs: These specific models need a divide RF antenna, which you can become every bit part of a kit here:
DIRECTV RC65RBK Universal RF Back Lit Remote and Antenna Kit for HR24 and other receivers (RC65RBK) from Solid Signal)
H25 receivers: These receivers need a special RF antenna dissimilar from the one above. Here'due south the link you'll need:
DIRECTV H25RFANT RF Remote Dongle Adapter for the H25 (H25RFANT) from Solid Point)
Genie, Genie Lite and Genie Clients: These boxes will only do RF with the supplied RC71, RC72, or RC73 remote.
THR22 TiVo: It is possible to program this box for RF but information technology's completely dissimilar from the procedure for the other boxes.
DIRECTV-Ready TVs cannot exist programmed for RF mode.
Pace three: Use the menus

Start by pressing {MENU}, then arrow down to "Settings & Aid," then printing {SELECT} one time "Settings" is highlighted.

Arrow down to "Remote Control" and press {SELECT} and so, with "Program Remote" selected, press {SELECT} over again.
STEP 4: Programming

If you take a self-programming remote, y'all should run into this warning message pop upward on screen. If y'all don't see this message, that just means your remote isn't cocky-programming, which is fine. If you need to, press {SELECT} to continue.

Arrow down to "Advanced" and press {SELECT}.

Brand certain "IR/RF Setup" is highlighted and press {SELECT.}

Hither's where it gets confusing. This screen is asking you to highlight what youwant the remote to exist, not what it currently is. Even if your remote is in IR mode, this screen can say "RF" because the receiver is thinking a stride ahead, trying to guess what you want. If y'all demand to modify information technology, press {SELECT} and brand sure it says "RF." Then printing {SELECT} once more.

With "Continue" highlighted, press {SELECT} again.
Your screens may be unlike if you are using the new Genie user interface, but the steps are basically the aforementioned.

On most receivers, you lot volition see a screen similar to this 1. (Genie users have information technology piece of cake… the remote will plan itself for RF.)

The goal hither is to follow the steps:
- Start by pressing {MUTE} and {SELECT} at the same time,. You'll need to hold them both down for about 3 seconds, until the low-cal flashes twice.
- On the remote, press 9 vi i
- And so, printing the half-dozen numbers shown on the screen. They will be dissimilar for every receiver.
- Printing {Aqueduct UP} and then {SELECT}
At this signal, if you press {SELECT} over again, y'all should go out this carte du jour. If y'all don't, effort over again.
If it doesn't work
If it doesn't work at all, go out the remote alone for 2 minutes. Everything should reset itself.
If that doesn't fix things, utilize the front console of the receiver. Start by pressing {Carte} and utilise the pointer keys to become through the steps shown in footstep 3 and four, just go through the setup for "IR" instead of "RF."
If that still doesn't prepare things, get through the same menus on the forepart console of the receiver simply in the remote setup, choose "Reset Remote" and follow the instructions on the screen. This will erase all your customizations (similar your Television set model) then it should be the concluding affair you try.
Here'southward a video for older DIRECTV receivers:
Source: https://blog.solidsignal.com/tutorials/set-directv-receiver-work-rf-mode/
0 Response to "Try Again or Select Rf Setup"
Post a Comment